Document Request Tab
On the Document Request tab, you can:
- View the following metrics:

- Due Date—deadline for the assessment completion.
- Note: When the assessment is completed, the Due Date widget changes to Assessment is completed.

- Note: When the assessment is completed, the Due Date widget changes to Assessment is completed.
- Percent Addressed—shows the percentage of all required documents that have already been addressed.
- Remaining Items to Address—shows the total number of items remaining to be addressed and a breakdown of that total by document type. The outer ring of the circle indicates the percentage of the total number of documents required in that category.
- Accepted Policies & Procedures and Implementation Evidence—shows the total number of policies and evidence items that have been accepted by your Security Compliance Advisor. The outer ring on the circle indicates what percentage of the total required documents the number represents.
- Due Date—deadline for the assessment completion.
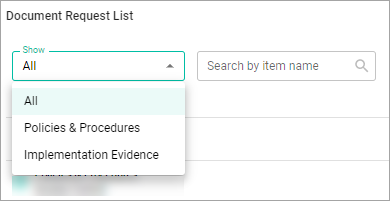
- View the full document request list or select only the Policies & Procedures or the Implementation Evidence documents.
- Carry over Document Requests and their attachments from a previous assessment.
- Search the document request list by item name.

- Assign multiple documents by selecting them from the table. In the upper right corner of the table, select the Actions button, and then Assign.
- Download Document Request List by selecting the Download button in the upper right corner of the table.
- Filter documents by Status, Assignment, Attachment, Function and Category.
In the Document Request List table, the information is grouped into the following columns:

- Item name—shows the name of the item.
- Status—shows the status of the item (Awaiting Documentation, Client Complete, Client Complete/Not Provided, Pending Client Review, Accepted).
- Assigned to—shows a user who was assigned to work on the item.
- Attachment—shows if the item has an attached file.
- Actions—shows the following icons with which you can:
- View details—view the detailed information about the item.
- Upload—attach the file to an item.
- Assign—assign the document.
- Ask a question—ask any question or clarification about the document.
To view the details of a document:
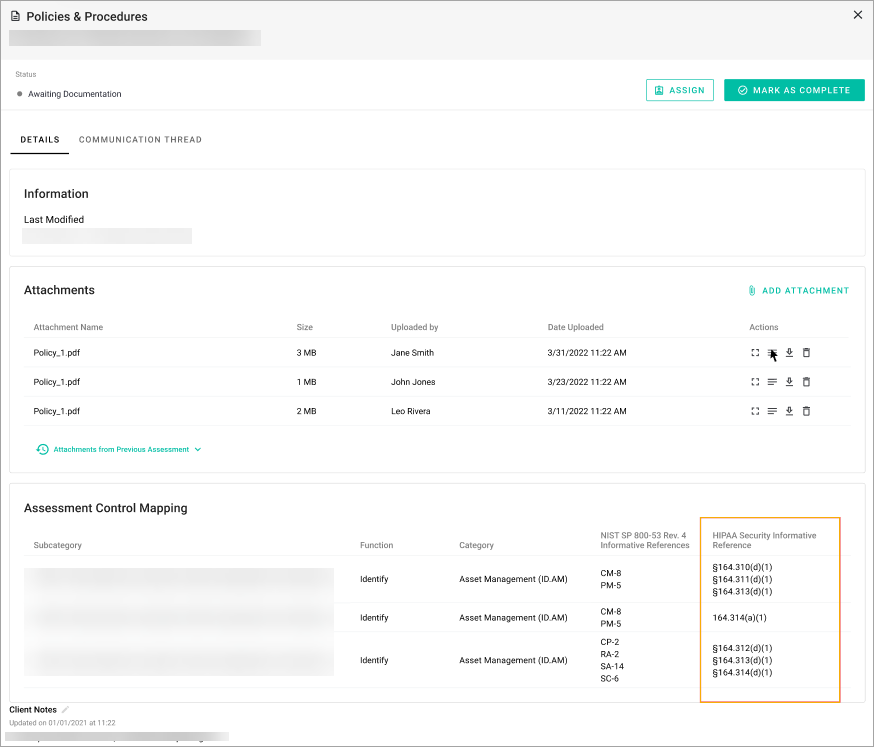
Select the View details icon next to it or select the needed document from the list. The pop-up window that appears, contains the following data:

- Document type, its name, and status.
- Details tab with the Attachments and Assessment Control Mapping sections.
- Document Description section provides a summary of the document’s content and purpose. This field is available only for documents of the Policies & Procedures type.
- In the Attachments section, you can:
- Attach a file.
- Note: To upload an attachment, select the Add attachment button. You can add up to 30 attachments with the .pdf, .docx, .xlsx, .pptx, .txt .ppt, .xls, .doc, .rtf, .odt, .jpg, .jpeg, .png, .gif, .bmp, .svg, .webp, .heic, .mp4, .mov, .avi, .mkv .wmv, .webm, .mp3, .wav, .aac, and m4a extensions. The maximum file size is 200 MB per file.
- View the attachment name, its size, information on who uploaded or carried over the file, date when it was uploaded or carried over; preview, download, or remove the attachment.
- Note: You can change the attachment type using the dropdown list.
- Carry over attachments from a previous assessment.
- Note: You can carry over all attachments from the previous assessment or carry over only selected attachments from the list.
- View attachments from a previous assessment.
- Note: Expand the Attachments from Previous Assessment section to view all the attachments. The section contains a list of attachments with details (name, type, size, user who uploaded the attachment and time when it was uploaded). Also, you can preview the note, preview, and download the attachment.
- Update note.
- Note: To update the note, select the Update note button. In the pop-up window that appears, you can view the information about the attachment and enter your message in the corresponding field. It should not exceed 500 characters.
- Download attachment.
- Remove attachment.
- Attach a file.
- The Assessment Control Mapping section provides the information about the document depending on the type of assessment:
- For NIST Assessment: Subcategory, Function, Category, NIST Reference, and HIPAA Security Informative Reference.
- For HIPAA Assessment: HIPAA Security Requirement, HIPAA Security Category, and HIPAA Reference.
- Client Notes related to a particular item. It is possible to add new notes or edit the existing ones. If a previous assessment of the same type (HIPAA or NIST) has Client Notes on Document Request details, they are copied to the corresponding Document Requests in the current assessment the moment it is created.
- Note: To add a note, enter your message in the Notes field and then select the Send icon or press the Enter button. Your message should not exceed 2500 characters.
- Information section that shows when and by whom the document was last updated.
- Communication Thread tab where you can ask Fortified experts any question about the document and upload an attachment.
To change the document status:
Select the needed item from the list to view the details and change its status.
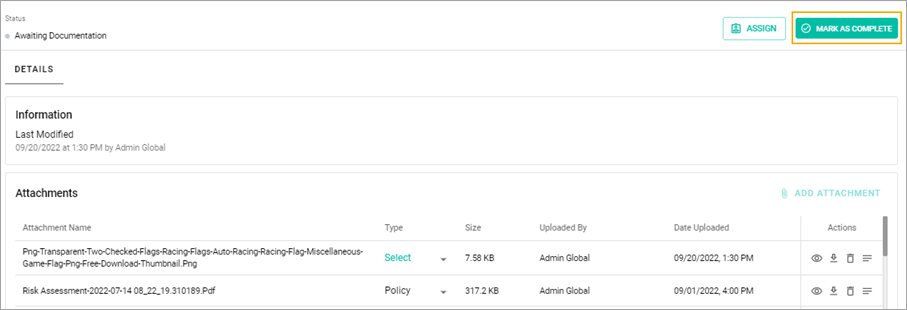
- If the document is in the Awaiting Documentation status, you can add an attachment to it and select the Mark as Complete button. The status of the document changes to Client Complete.

- If the document is in the Client Complete/Not Provided by status, you can assign the document.
- To assign the document:
- In the Actions column or in the View details pop-up window, select the Assign button.
- In the Document Assignment window that appears, select the needed user from the dropdown list and select the Submit button.
- Note: To unassign or reassign a user, in the View details pop-up window, select the Pencil icon next to the user name.
- To assign the document:
To carry over document requests and attachments:
You can carry over Document Requests and their attachments from the previous assessment only within the same assessment type—such as from HIPAA to HIPAA, or from NIST to NIST.
If the assessment is In Progress, do the following:
- In the upper-right corner, select the Carry Over Items button.
- Note: The visibility of the Carry Over Items button varies according to the assessment status. It is hidden in the Completed assessments and hidden if no corresponding previous completed assessment exists.
- In the Carry Over Confirmation pop-up window, select the Accept button.
- Select the Document Request line to expand its details. Inside the expanded view you can:
- View attached files.
- View attachment details.
- Preview attachments, view attachment notes, and download attachments.
- Select the Document Requests or attachments that you want to carry over.
- Note: Some Document Requests can be disabled for transfer if their attachments were already carried over to the current assessment, or if the corresponding Document Request in the current assessment is not in Awaiting Documentation or Pending Client Review status.
- Select the Carry over selected button to move specific documents or Carry over all to transfer all documents.
- Select the Yes, carry over button.
On the details section of the Document Request Item, you can carry over items from the Attachments from Previous Assessment section:
- On the Document Request tab, select the document to view its details.
- Expand the Attachments from Previous Assessment section.
- Select the attachments that you want to carry over.
- Note: Some attachments can be disabled for transfer if they have been already carried over within the current document request, if the current document request is not in Awaiting Documentation or Pending Client Review status, or if the document request is not eligible to have attachments that can be carried over.
- Select the Carry over selected button to move specific documents or Carry over all to transfer all documents.
- Select the Yes, carry over button.
Related Topics